
 |
Bienvenue invité ( Connexion | Inscription )
 2 Mar 2012, 20:41 2 Mar 2012, 20:41
Message
#1
|
|
 Adepte de Macbidouille  Groupe : Membres Messages : 150 Inscrit : 1 Dec 2002 Lieu : Angers Membre no 4 960 |
Voilà, mon iMac est malade avec les fameuses taches sur la dalle ! Ces taches se situent entre la dalle et le feuillet de rétro-éclairage transparent. J'ai donc démonté mon mille-feuille d'iMac pour aller enlever la poussière qui fait tache.
Vous trouverez sur www.ifixit.com les instructions pour enlever l'écran, je vous montre ici comment dépiauter l'écran lui-même ! Munissez vous d'une ventouse de GPS ou téléphone portable pour enlever la dalle en verre, plutôt que d'acheter une ventouse spécifique ! Vous collez la ventouse en haut à gauche et tirez ! J'ai nettoyé le feuillet transparant pleins de poussière avec du produit à vitre en le pulvérisant sur un chiffon propre. Pensez à nettoyer aussi la face arrière du LCD qui fait contact avec le feuillet de rétro-éclairage ! Achetez une bombe d'air sec (rayon informatique) pour les finissions, pour enlever les petits grains de poussière qui se déposeront lors des manipulations Malheureusement je n'ai pas de photos AVANT/APRÈS mais ça y est je n'ai plus de tache (mais avant combien de temps !!!) DURÉE : 2 à 3 heures. Sachant que j'avais oublié de re-brancher l'alimentation de l'écran sur la carte mère au 1er remontage, j'ai dû démonter l'écran une 2ème fois ! Plus de peur que de mal !  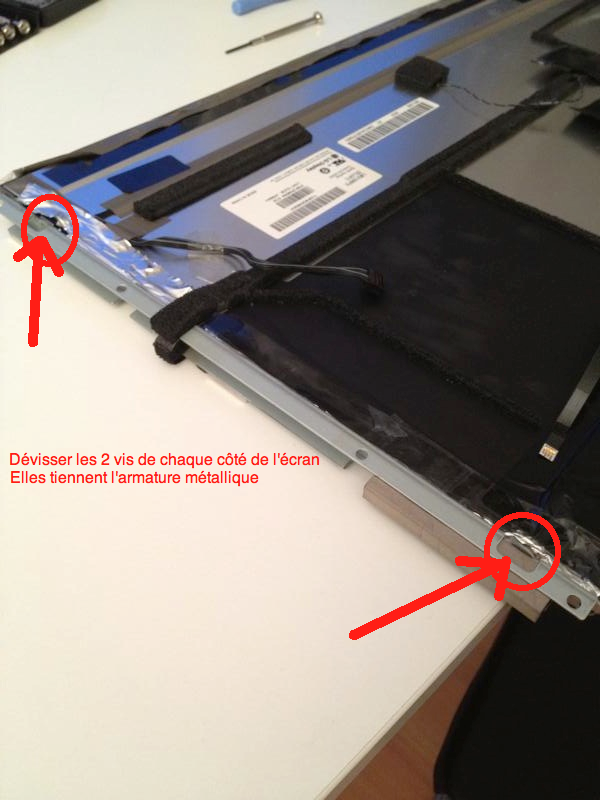 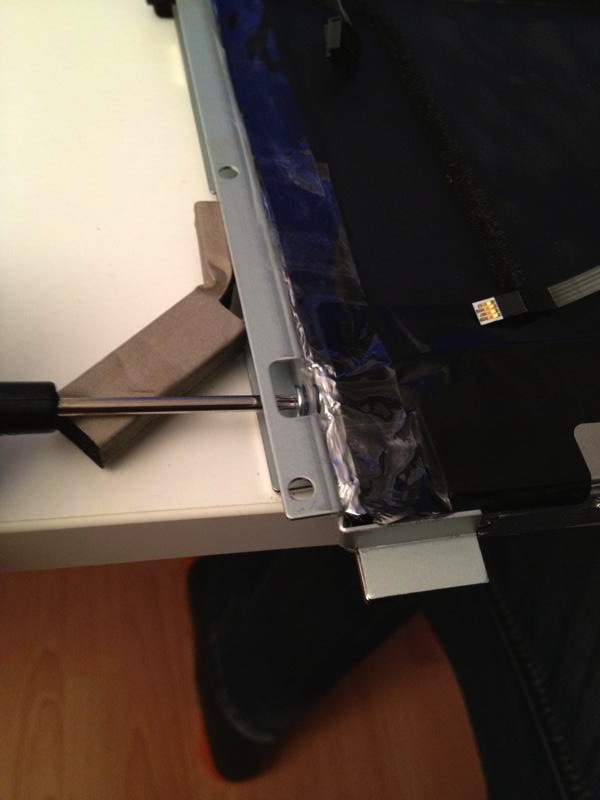 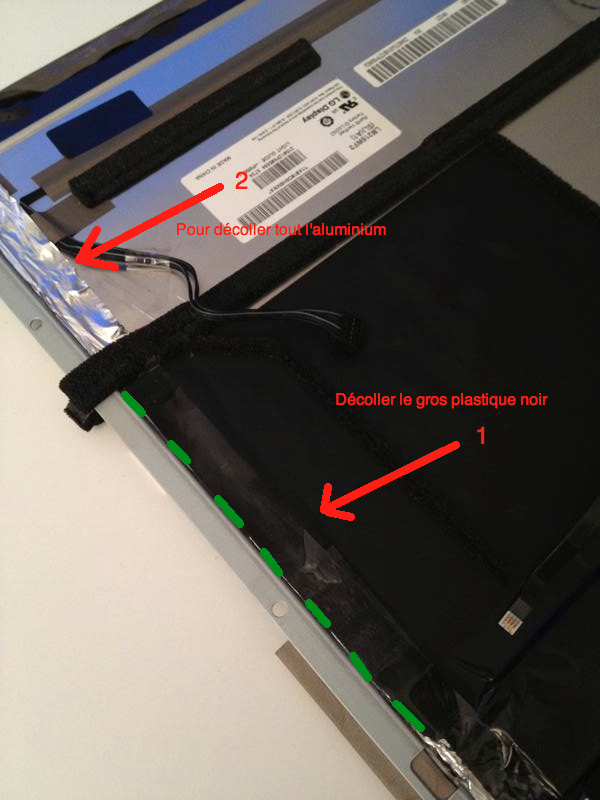 Enlever l'armature métallique tenue par des vis (celle qui permet de visser l'écran au iMac). Elle est un peu collée, vous pouvez faire levier avec un tournevis plat Quand vous mettez l'écran dans le bon sens et que vous regarder la dalle, il reste une armature métallique tout autour. Pour l'enlever, il faut décoller tous les rubans en alu, ruban noir ou ruban gris qui "fait joint" 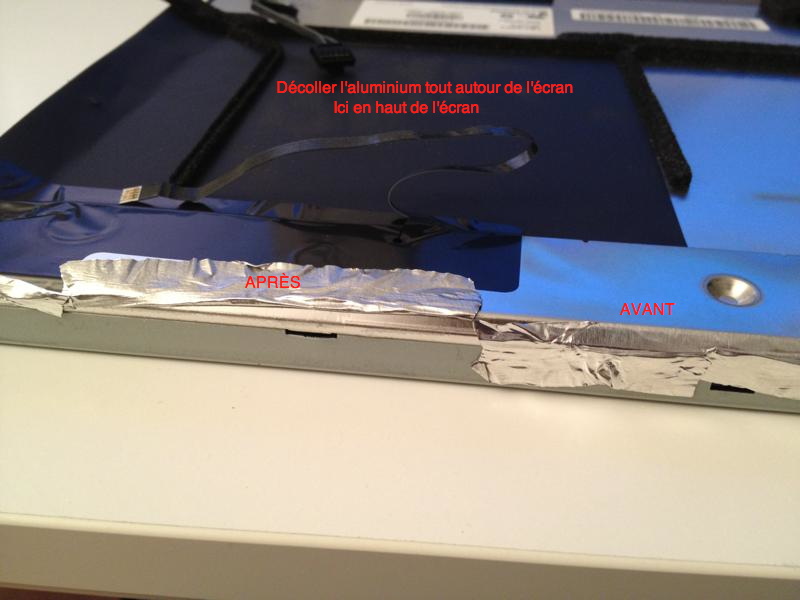 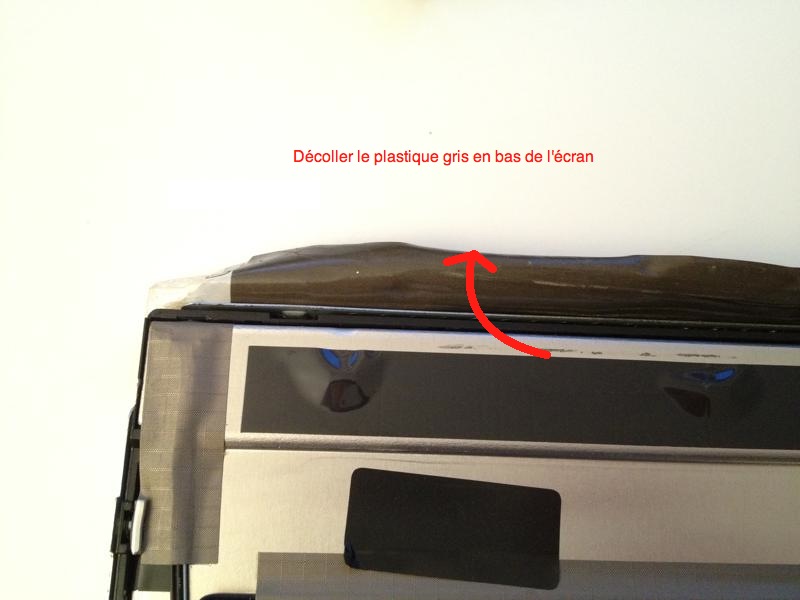 On va maintenant enlever l'armature métallique qui encercle la dalle, en déclipsant les ergos tout autour de l'écran. Commencez par un côté puis le bas de l'écran puis l'autre côté. Le haut de l'écran est trop difficile à enlever donc quand vous aurez fait sauter tous les ergos et que vous ferez levier vers le haut, les ergos du haut se décliperont tout seul ! 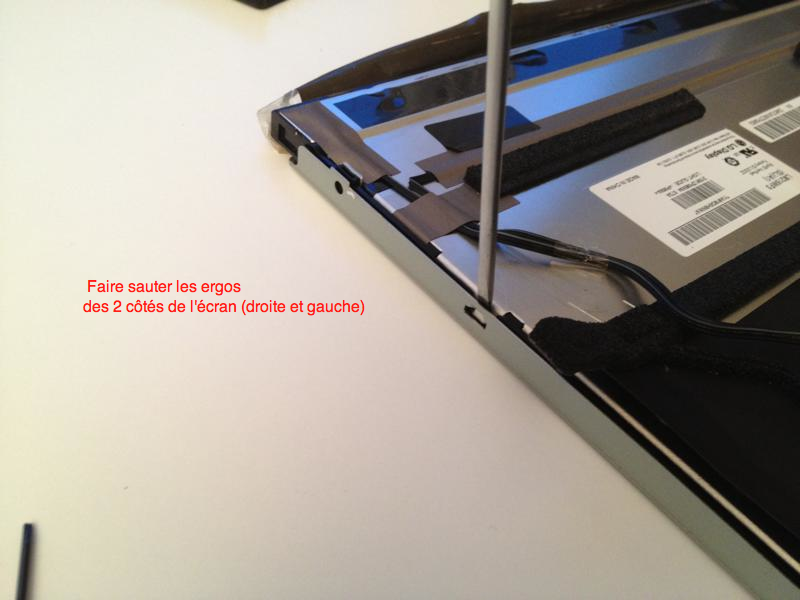 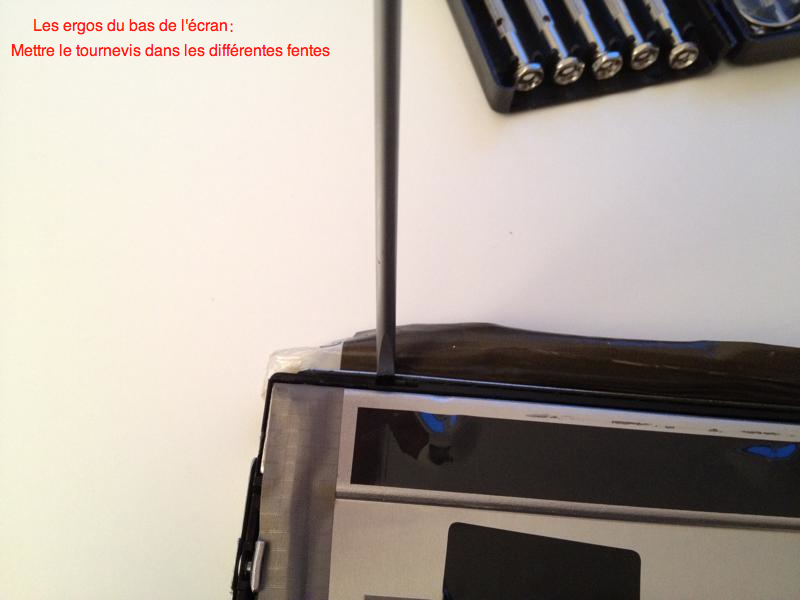 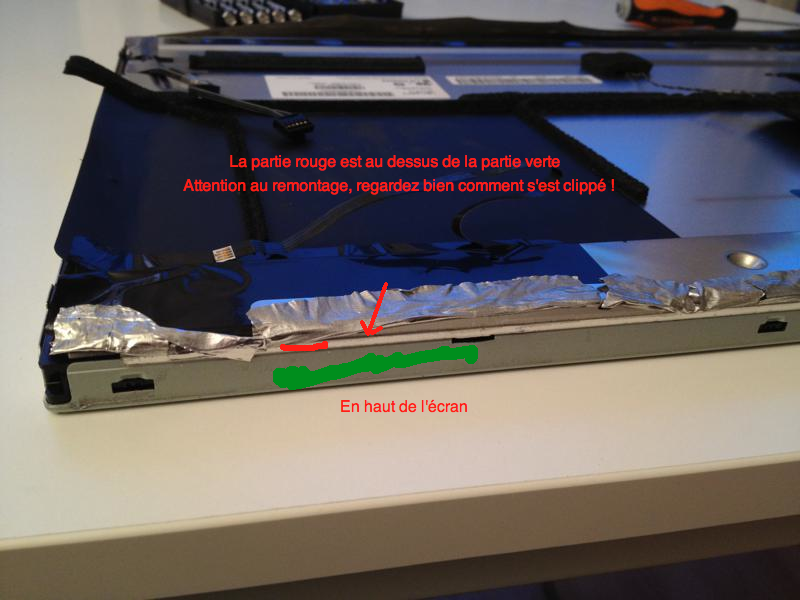 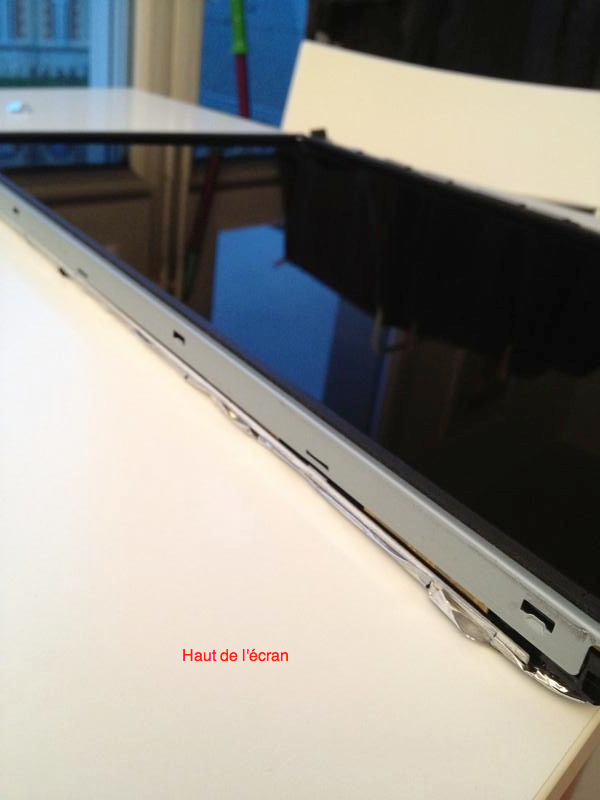 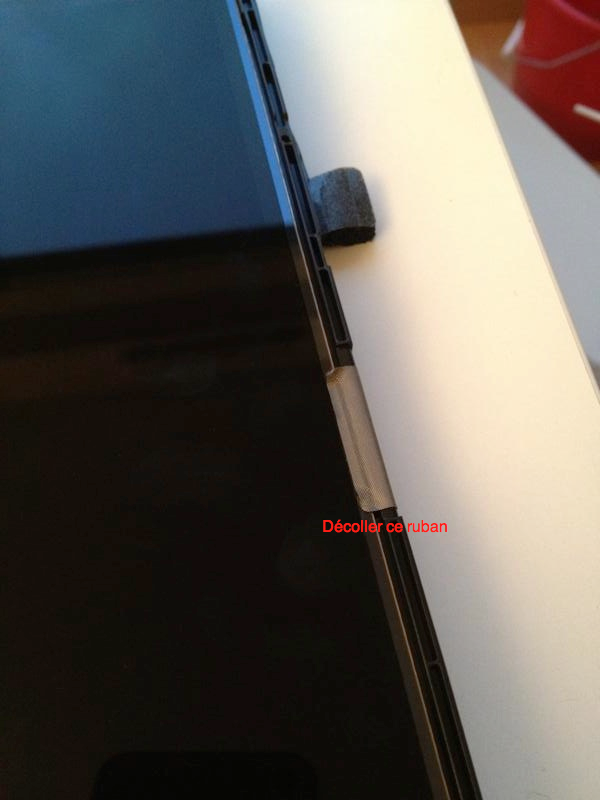 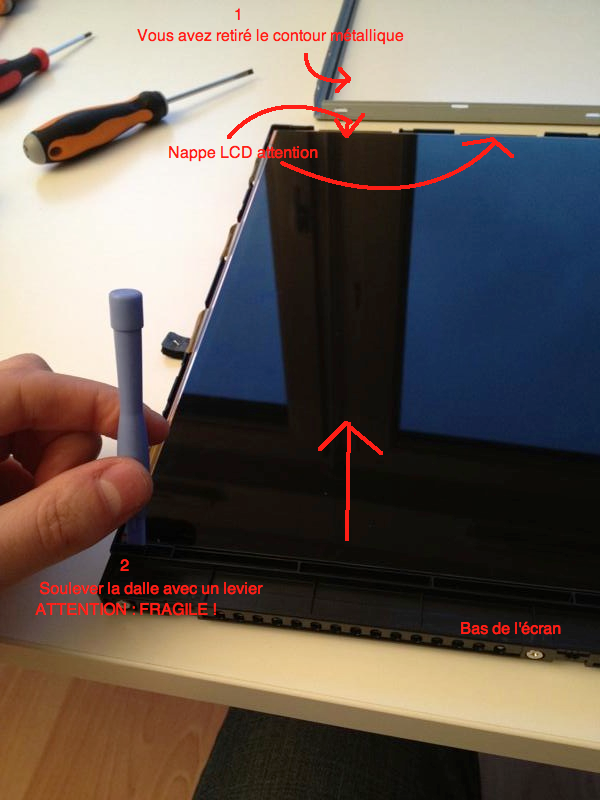 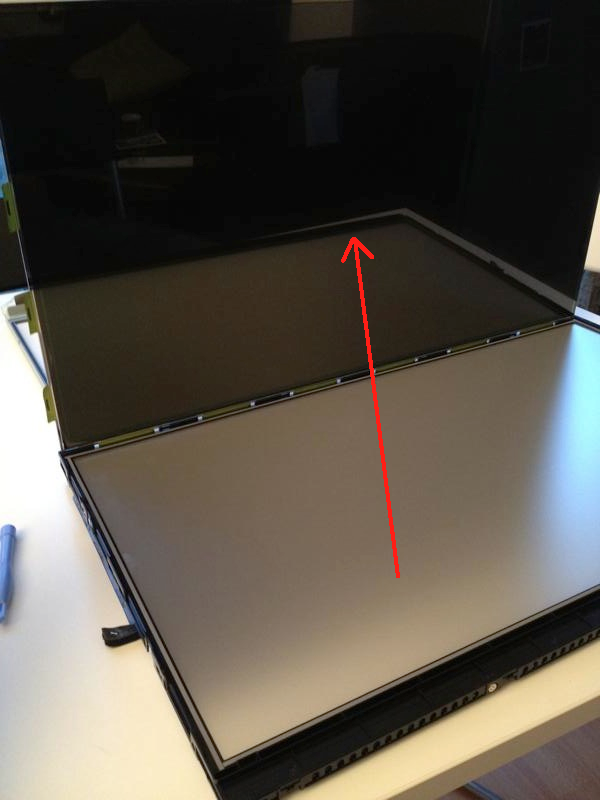 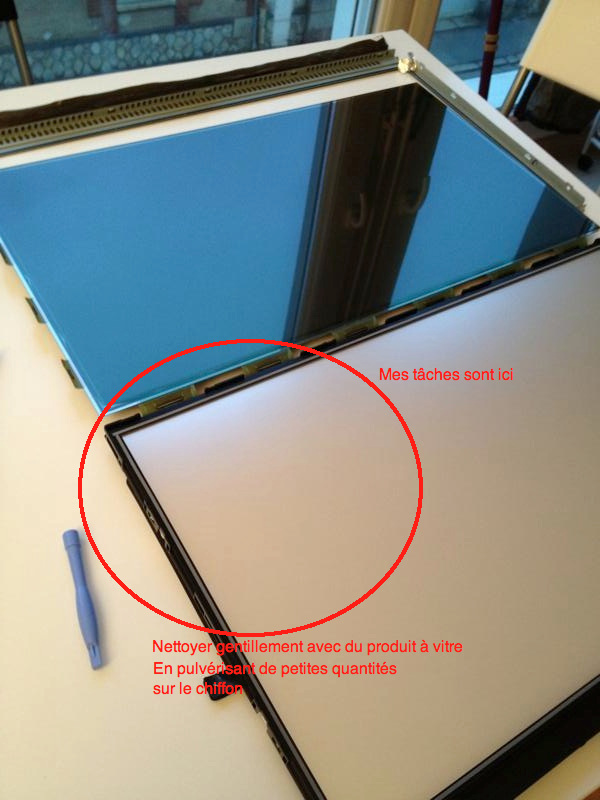 Editus moderatus : Voir ci-dessous un complément d'information pour les iMac 24" 2008 : http://forum.macbidouille.com/index.php?sh...p;#entry3702110 Ce message a été modifié par baron - 24 Jun 2017, 20:34.
Raison de l'édition : Nettoyer les taches est une sale tâche…
-------------------- Mac Pro 1,1 2x3Ghz + Ecran 23" LG 3D
MacBook Air 2,13Ghz 128Go SSD iPhone 4 32Go, Forfait Virgin Mobile Internet câblé Numéricable |
 |
 
|


 |
Réponse(s)
|
18 Apr 2012, 19:45
Message
#2
|
|
|
Nouveau Membre Groupe : Membres Messages : 1 Inscrit : 18 Apr 2012 Membre no 176 019 |
Bon, excusez l'excursus polilanguagique.
Le Francais etant la langue que je parle less! Mais piusque MB m'ha fait voire la solution voila mes petit 2€c Italien et anglais suivent. Noter le Bold "OK, nobody is perfect e neanche Apple lo è. Il 27' di PZ la polvere l'aveva. Ma "impossible is nothing" e allora... Okkio: L'intervento richiede una buona dose di temerarietà "Ok, guys. My 27' underwent a dusty screen substitution just some 6month ago, care of the mothership. The "new" screen got his dust some month ago. So not trusting Apple or LG for that matter anymore and being an aggressive DIYever I started looking around and found that in fact the cleaning was possible. Thanks OGGY for that. As all surgery in the innards of a computer or electronics you take risks and I was ready to risk the live of my iMac. To get to the bare LG screen is no big issue (except for detaching the cables connecting it the the innards: The assemblers must have small hands). iFixit shows you how to get there and getting rid of the brackets fixing the screen to the case was just a matter of patience since they are partially glued. Now, the screen assembly is crap. Congrats to LG and Apple's quality control. A lot of possibilities for dust to get between what looks like the LED backlight plate and the LCD itself. I decided to get rid of all alu and other taping and redo it. I found a suitable 5cm high 3m alu tape at Conrad.de for 17 euros (50m length) Better have a buddy while managing the cleaning operation and disassembly as well as the rest of the operations since often you need a third or fourth hand to keep the screen vertical or holding the LCD part while you clean it. The dust is relatively easy to get rid of both from the backplate and the LCD. Be careful to check carefully that the surfaces are really clean before putting the LCD back in place. /Innovation: I retaped the whole covering the first 3mm of the LCD all around, paying attention to the edges and resealing all the backside where cable connections are and 3rd class plastic tape used OEM. End of innovation/ Reassembly was easy (except for refitting the cables, since my hands are not the ones of a baby). Special thanks to Luigi who motivated me to intervene and who lend his hand to get this done. Without him it would have been a no-go. Time: 3hous 30min (including the final testing and beer!) Tools: some torx drivers, fingernails, a damp no fuss cloth and the alu tape. The screen now is working and dustless. Hopefully also dustsealed! PS: I follow a relatively large number of Mac buddies. !00% of those with a recent iMac have the dust prob." Postato sullo thread @macrumors oggi. Ce message a été modifié par pzellner - 19 Apr 2012, 09:25. |
|
|
|
Les messages de ce sujet
 mathichoux [TUTO] Nettoyer les taches d'un iMac 21,5" malade 2 Mar 2012, 20:41
 Skywalker_tattoo Waw, fameux démontage. C'est risqué ou il fa... 5 Mar 2012, 00:14 zero J'ai déjà tenté une opération de ce genre ... 5 Mar 2012, 02:31 Y E S Ha oui, ben dis donc, là je suis vraiment impress... 5 Mar 2012, 03:12 renards encore heureux que je n'ai pas ce problème av... 5 Mar 2012, 04:44
 Jedge Citation (renards @ 5 Mar 2012, 04:44) en... 5 Mar 2012, 15:10 pierrette Pour m'on cas, je m'y suis fais aux taches... 5 Mar 2012, 07:13 apenSPEL Je me trompe ou le ruban d'alu collé sert pr�... 5 Mar 2012, 07:39 mathichoux Citation (apenSPEL @ 5 Mar 2012, 07:39) J... 5 Mar 2012, 08:07 apenSPEL Citation (mathichoux @ 5 Mar 2012, 10:07)... 5 Mar 2012, 11:21 tama Wow, risqué effectivement. S'assurer aussi d... 5 Mar 2012, 07:41 fredtravers Félicitations ... 5 Mar 2012, 07:46 Leda Bonjour,
bravo pour la technique mais ce n'es... 5 Mar 2012, 08:37 Joël Pierre Est-on obligé de remettre la vitre (qui est le pr... 5 Mar 2012, 10:45 Halx Bravo ! Quelle prouesse ! 5 Mar 2012, 12:42 fr78 Un grand bravo à ceux qui se lancent dans une op�... 5 Mar 2012, 13:35 Fuji Chapeau bas Monsieur. Jolie intervention!... 6 Mar 2012, 02:35 Bubu Bonjour,
J'ai l'impression qu'il manq... 15 Mar 2012, 06:05 Rizo Ça m'intéresse pour l'iMac de mon meille... 5 Dec 2012, 01:56 mathichoux Apparemment les photos sont revenues !
Sinon ... 3 Jan 2013, 21:03 Bubu Citation (mathichoux @ 3 Jan 2013, 10:03)... 24 Feb 2013, 20:48 renan35 Citation (Bubu @ 24 Feb 2013, 21:48) Cita... 24 Jun 2017, 15:06 Phil1982 Deterrage de tuto mais je viens de suivre la meme ... 21 Nov 2014, 17:02 renan35 Il faut faire très attention aux traces sur la da... 21 Jun 2017, 18:03 g4hd Est-il encore possible (depuis 2012) de supprimer ... 22 Jun 2017, 08:41
Jedge Citation (renards @ 5 Mar 2012, 04:44) en... 5 Mar 2012, 15:10 pierrette Pour m'on cas, je m'y suis fais aux taches... 5 Mar 2012, 07:13 apenSPEL Je me trompe ou le ruban d'alu collé sert pr�... 5 Mar 2012, 07:39 mathichoux Citation (apenSPEL @ 5 Mar 2012, 07:39) J... 5 Mar 2012, 08:07 apenSPEL Citation (mathichoux @ 5 Mar 2012, 10:07)... 5 Mar 2012, 11:21 tama Wow, risqué effectivement. S'assurer aussi d... 5 Mar 2012, 07:41 fredtravers Félicitations ... 5 Mar 2012, 07:46 Leda Bonjour,
bravo pour la technique mais ce n'es... 5 Mar 2012, 08:37 Joël Pierre Est-on obligé de remettre la vitre (qui est le pr... 5 Mar 2012, 10:45 Halx Bravo ! Quelle prouesse ! 5 Mar 2012, 12:42 fr78 Un grand bravo à ceux qui se lancent dans une op�... 5 Mar 2012, 13:35 Fuji Chapeau bas Monsieur. Jolie intervention!... 6 Mar 2012, 02:35 Bubu Bonjour,
J'ai l'impression qu'il manq... 15 Mar 2012, 06:05 Rizo Ça m'intéresse pour l'iMac de mon meille... 5 Dec 2012, 01:56 mathichoux Apparemment les photos sont revenues !
Sinon ... 3 Jan 2013, 21:03 Bubu Citation (mathichoux @ 3 Jan 2013, 10:03)... 24 Feb 2013, 20:48 renan35 Citation (Bubu @ 24 Feb 2013, 21:48) Cita... 24 Jun 2017, 15:06 Phil1982 Deterrage de tuto mais je viens de suivre la meme ... 21 Nov 2014, 17:02 renan35 Il faut faire très attention aux traces sur la da... 21 Jun 2017, 18:03 g4hd Est-il encore possible (depuis 2012) de supprimer ... 22 Jun 2017, 08:41 |
1 utilisateur(s) sur ce sujet (1 invité(s) et 0 utilisateur(s) anonyme(s))
0 membre(s) :
| Nous sommes le : 28th April 2024 - 04:58 |